12 Easy DIY Projects Without Power Tools for Beginners
DIY can feel intimidating when every tutorial seems to start with a drill, saw, sander, or a garage full of tools.
But not every home project needs power tools. Some of the most useful beginner projects only need simple supplies, a little measuring, and enough patience to not rush the job.
These easy DIY projects without power tools are made for normal homes, rentals, apartments, small spaces, and busy family houses. They’re small upgrades that can make your home feel cleaner, more organized, and more comfortable without turning your weekend into a renovation.
Before you start, always read product labels, test adhesives or cleaners on a hidden spot when needed, and check your lease if you rent. Even “removable” products can sometimes damage paint, trim, cabinets, or doors if the surface is old or the product is removed too fast.
Table of Contents
Easy DIY Projects Without Power Tools That Actually Help
The best beginner DIY projects solve little problems you deal with every day.
If bags always land on a chair, add hooks. If the bathroom counter is always messy, create a tray system. If drawers are chaotic, add dividers. None of this needs to be dramatic. The point is to make your home easier to live in.
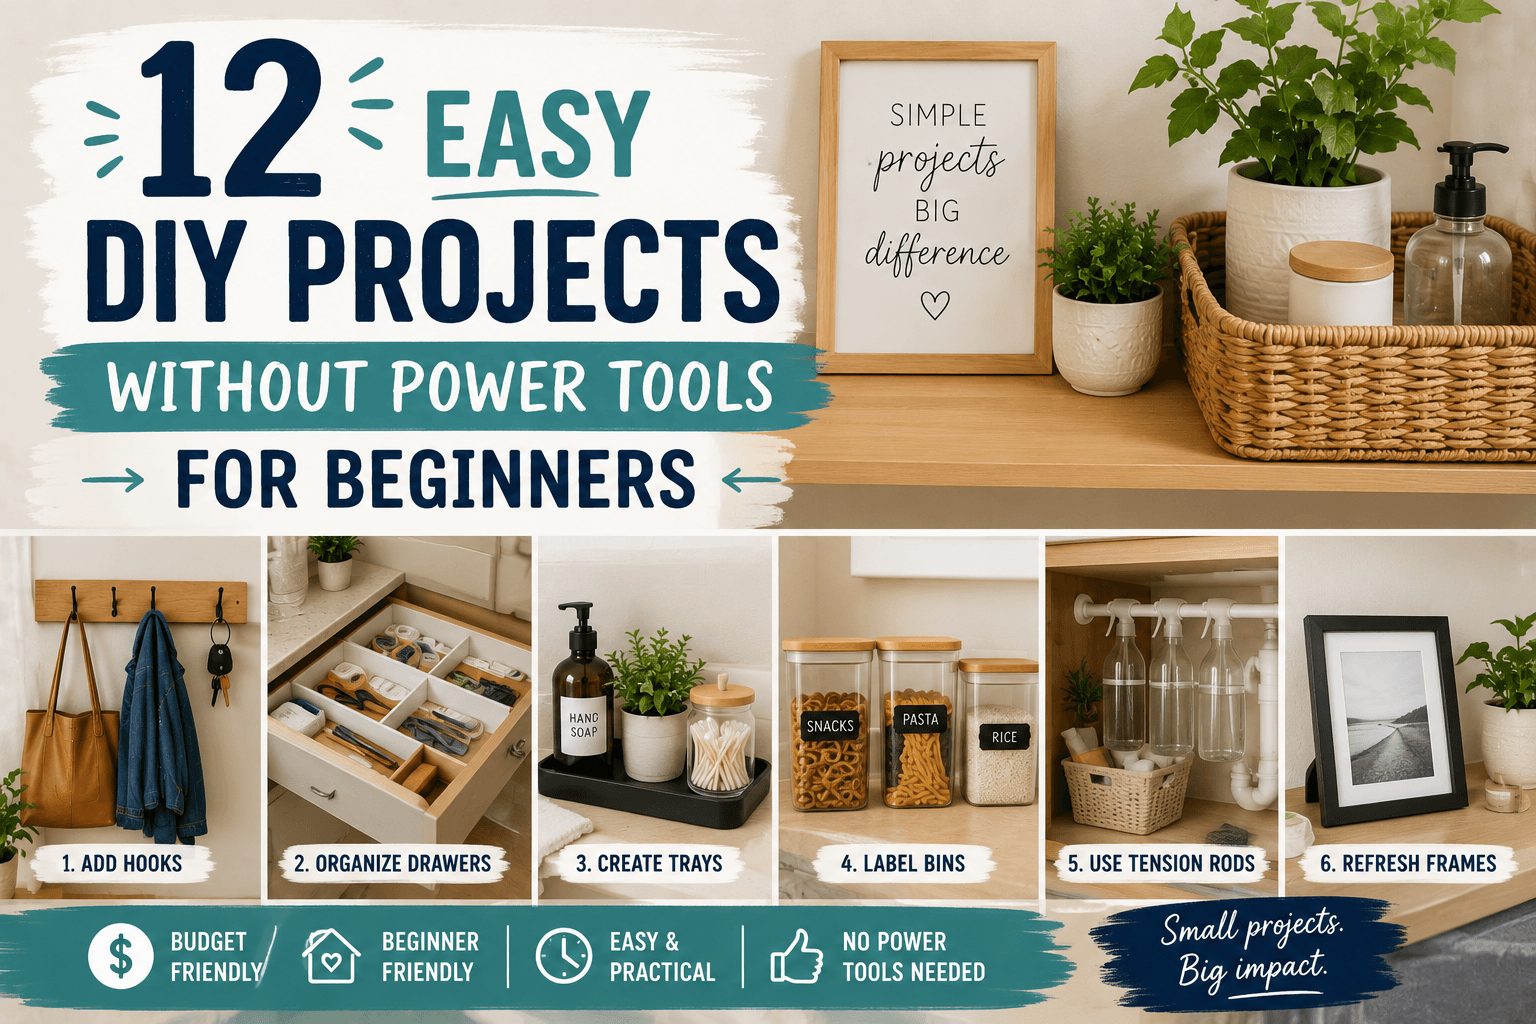
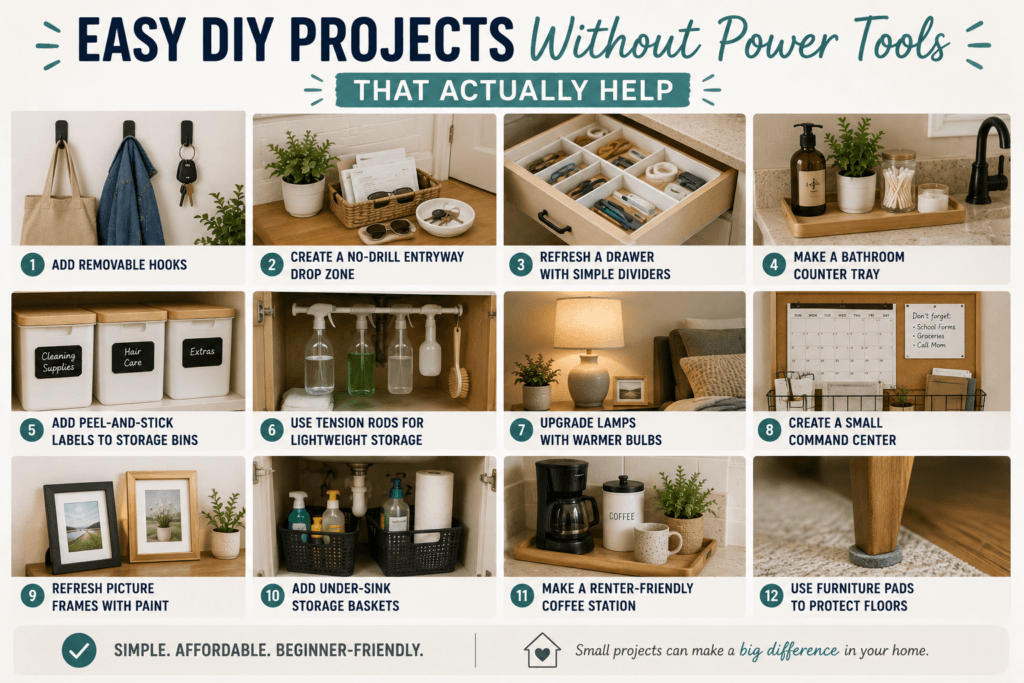
1. Add Removable Hooks Where Clutter Collects
Use removable hooks in spots where items naturally pile up.
Good places include entryways, closets, bathrooms, laundry areas, inside cabinet doors, and bedroom corners.
Why it works: hooks make it easier to hang items than drop them on the floor, counter, or chair.
Example: In a small apartment, add two removable hooks near the front door for keys, a reusable bag, or a light jacket.
Small warning: Follow weight limits and removal instructions. Adhesive hooks can still peel paint, especially on older walls or flat paint.
2. Create a No-Drill Entryway Drop Zone
Even if your home doesn’t have a real entryway, you can create a small landing area.
Use a tray, basket, shoe rack, small table, or removable hooks.
Why it works: keys, mail, shoes, wallets, and bags need a home near the door or they spread into the kitchen and living room.
Example: Use a small tray for keys and sunglasses, a basket for mail, and a simple shoe rack underneath.
Small warning: Don’t block walkways. A drop zone should make leaving easier, not create a tripping hazard.
3. Refresh a Drawer With Simple Dividers
Pick one messy drawer and give it sections.
Use adjustable dividers, small boxes, or drawer trays for kitchen tools, office supplies, bathroom items, or junk drawer basics.
Why it works: drawers get messy because everything slides around. Dividers give small items a place to stay.
Example: In a kitchen drawer, separate measuring spoons, bag clips, batteries, pens, and tape so you don’t have to dig every time.
Small warning: Don’t buy organizers before emptying the drawer. Sort first, toss trash, remove duplicates, then measure.
4. Make a Bathroom Counter Tray
A tray can make a bathroom counter look cleaner without adding cabinets or shelves.
Use it for hand soap, lotion, a small plant, cotton swabs, or daily skincare.
Why it works: a tray groups small items so they look intentional instead of scattered.
Example: In a rental bathroom, place soap, lotion, and a small jar of cotton rounds on one tray. Store everything else under the sink or in a drawer.
Small warning: Don’t let the tray become a catch-all for every bottle you own. Keep it limited.
5. Add Peel-and-Stick Labels to Storage Bins
Labels help when bins hide what’s inside.
Use simple peel-and-stick labels for pantry bins, closet bins, bathroom extras, cleaning supplies, kids’ items, or craft supplies.
Why it works: labels make it easier to find things and put them back.
Example: Label bins “extra toiletries,” “batteries,” “medicine cabinet extras,” “winter hats,” or “snacks.”
Small warning: Don’t label every single thing in your home. Use labels where they actually reduce confusion.
6. Use Tension Rods for Lightweight Storage
Tension rods are useful because they don’t require drilling.
Use them under sinks, inside closets, or in cabinets for lightweight items.
Why it works: they create extra hanging or dividing space without permanent hardware.
Example: Under the kitchen sink, use a tension rod to hang a few spray bottles and free up the cabinet floor.
Small warning: Don’t hang heavy items. If the rod slips, it can knock things over or damage the cabinet.
7. Upgrade Lamps With Warmer Bulbs
This is one of the easiest home improvement tips that doesn’t feel like a project.
Swap harsh, cool bulbs for warmer bulbs in lamps, bedrooms, living rooms, or reading corners.
Why it works: lighting changes the mood of a room fast. Softer lighting can make a home feel warmer and more comfortable.
Example: In a living room that feels cold at night, try warm white bulbs in table lamps instead of relying only on overhead lighting.
Small warning: Check the lamp’s maximum wattage and use the right bulb type.
8. Create a Small Command Center
A command center doesn’t need to be fancy.
Use a basket, small folder, calendar, notepad, or wall file if your lease allows it.
Why it works: mail, bills, school papers, coupons, and reminders need one place to land.
Example: Put a small paper tray on a kitchen counter or entry table for “important papers only.” Toss junk mail right away.
Small warning: Don’t make the system too complicated. If it has too many categories, it probably won’t last.
9. Refresh Picture Frames With Paint
Old frames can look better with a little paint.
Use craft paint or spray paint to make mismatched frames feel more coordinated.
Why it works: matching or coordinated frames make photos and prints feel more put together.
Example: Paint several thrifted frames black, white, brass, or soft brown so they work together on a shelf or gallery wall.
Small warning: Paint in a ventilated area, protect surfaces, and let frames dry fully before bringing them back inside.
10. Add Under-Sink Storage Baskets
Under-sink areas get messy fast.
Use baskets or bins to group items like cleaning supplies, extra soap, sponges, trash bags, dishwasher pods, or bathroom backups.
Why it works: baskets stop bottles and small items from spreading everywhere.
Example: Under a bathroom sink, use one bin for hair products, one for cleaning supplies, and one for extra toilet paper or soap.
Small warning: Keep cleaners safely away from kids and pets. Also, don’t ignore leaks under the sink. Fix or report moisture problems first.
11. Make a Renter-Friendly Coffee Station
Create one small area for coffee or tea supplies.
Use a tray, mug rack, small basket, or cabinet shelf near your coffee maker or kettle.
Why it works: grouping coffee supplies keeps the counter from getting messy and makes mornings easier.
Example: Place coffee pods, sugar, filters, and a spoon on a small tray beside the coffee maker. Store extras in a cabinet.
Small warning: Keep the station small. If it takes over too much counter space, it stops being helpful.
12. Use Furniture Pads to Protect Floors
Add felt pads under chair legs, stools, tables, and furniture that moves often.
Why it works: pads reduce scratches, make furniture quieter, and protect floors in rentals and homes with hard flooring.
Example: In an apartment dining area, felt pads under chairs can reduce scraping noises and floor marks.
Small warning: Check the pads every few months. Dirt can stick to them and scratch floors if they get gritty.
Common Mistakes to Avoid
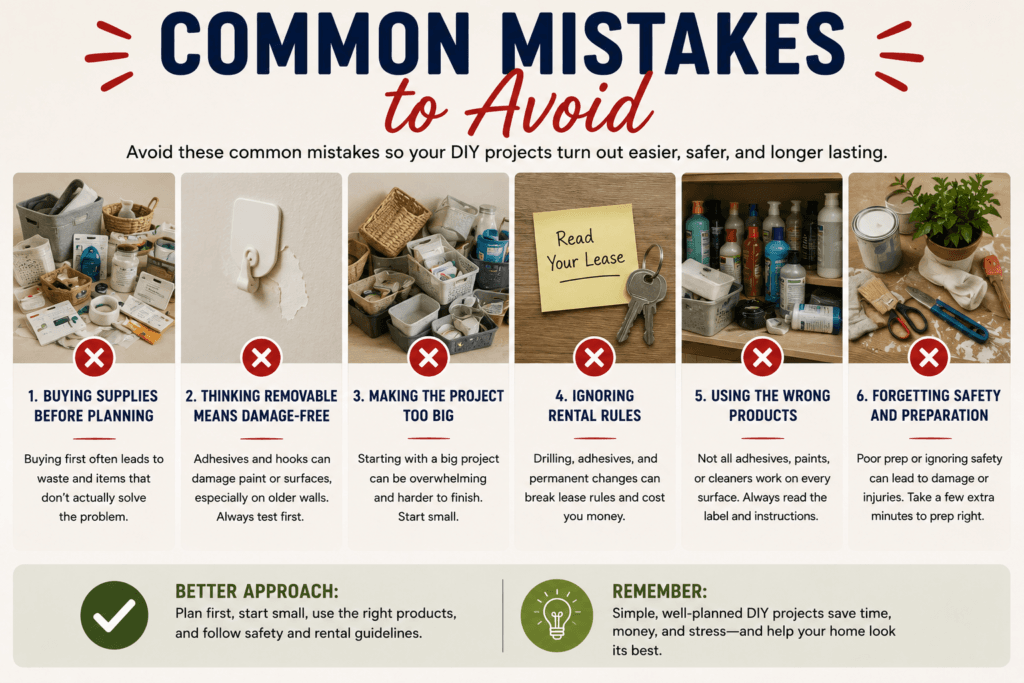
Buying Supplies Before Choosing the Project
It’s easy to buy cute bins, hooks, trays, and labels before knowing what you actually need. Pick the problem first, then buy supplies.
Assuming Removable Means Damage-Free
Adhesive hooks, peel-and-stick labels, and removable strips can still damage surfaces. Test first and follow instructions.
Making the Project Too Big
Beginner DIY works best when it feels finishable. Start with one drawer, one counter, one shelf, or one entryway corner.
Ignoring Rental Rules
Renters should check the lease before using adhesive products, hanging items, changing hardware, painting, or attaching anything to walls, doors, or cabinets.
Using the Wrong Product for the Surface
Some adhesives don’t work well on textured walls, flat paint, tile, wood, or humid bathrooms. Read labels before applying.
Forgetting Safety
Keep cleaners, sharp tools, paint, and small items away from kids and pets. Use ventilation when painting or using strong products.
Quick Checklist: No-Power-Tool DIY Projects
Use this before starting:
- Pick one small problem area
- Check lease rules if you rent
- Measure before buying supplies
- Test adhesives on a hidden spot
- Read product labels
- Keep daily-use items easy to reach
- Avoid overloading hooks or rods
- Store cleaners safely
- Keep the project simple enough to finish
- Stop if you find water damage, mold, or electrical issues
Conclusion
These easy DIY projects without power tools are simple ways to make your home feel more useful, organized, and comfortable without taking on anything overwhelming.
Start small. Add a hook where bags pile up. Fix one drawer. Make the bathroom counter easier to wipe. Create a coffee station. Add baskets under the sink.
Small projects like these may not look dramatic, but they make everyday life easier. And for beginners, that’s exactly where DIY should start.